Table Of Content

Be sure to leave some space between them to create an effect of individual hairs. Although unlike the previous example you can make them slightly less apparent to give the hair a smoother and neater look. Adding color to the mix can bring your drawings of people to life, but it can also make the drawing process even more complex. It’s important to note that drawing, especially portraits, is not something you can learn in a day. Drawing people accurately takes a solid understanding of anatomy and a lot of practice. So be prepared to do a lot of work before diving in and trying to draw the favorite people in your life.
How to Draw Curly Hair Step by Step
Hair has always been present in art, being the common nightmare of the beginner artist. However, in this tutorial, you’re going to learn how to draw and shade hair in an easy way. • The little strands on Step 3 follow a very similar direction, but slightly more pronounced, enough to add dynamism to the shape of the hair clump.
Step 5 – Finish drawing the thicker lines
“Lighting” is an extensive and super interesting topic, and I am afraid that what I explain here is not enough to cover it! I’d recommend researching and practicing as much as possible. I am going to use the value scale to define details and give a 3D effect to the hair shapes. I might change my mind later on, but this stage allows me to see my hair ideas more clearly.
Trending Articles

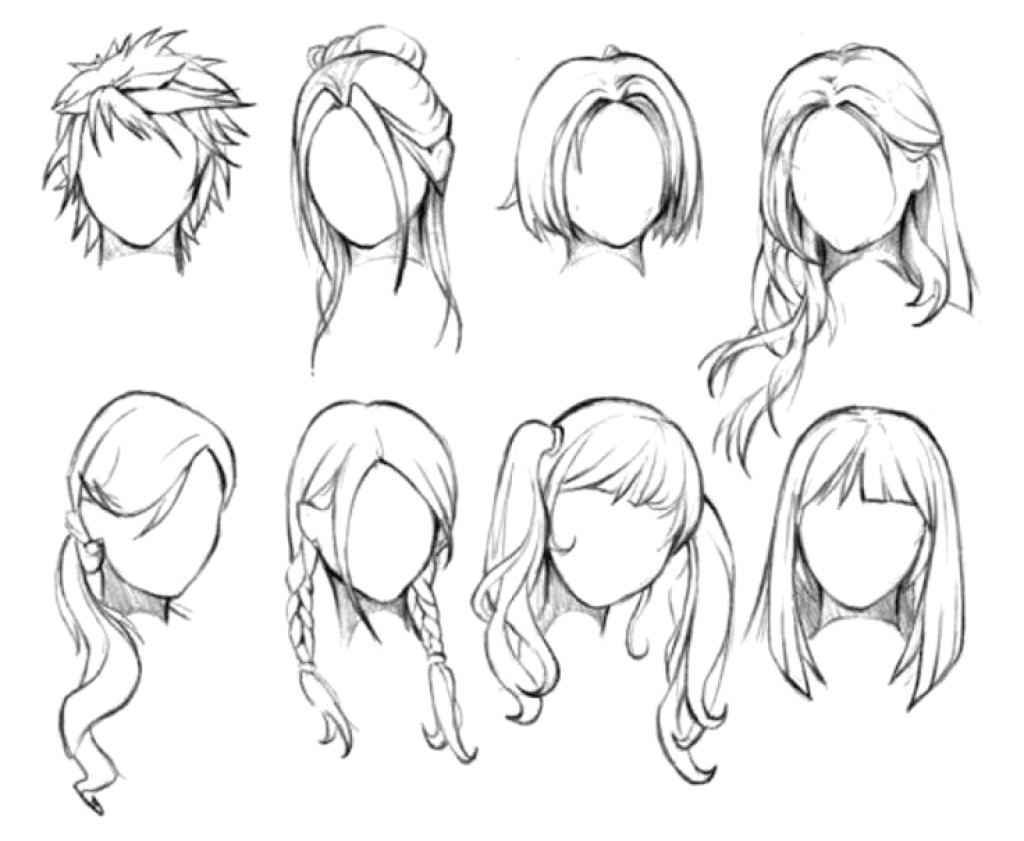
From short to long and curly, drawing hair with these tips will make your drawings more realistic and accurate. Practice drawing different textures, colors and lengths to perfect your hair drawings. Then, combine facial features with your drawings to create realistic portraiture! Drawing hair is the first step to creating stunning and accurate portrait and figure drawings. Understanding how hair is drawn and behaves may even help you draw animals! The possibilities are endless with Lee Hammond’s essential tips for drawing hair.
Watch SNL's cut sketch about saving Donald Trump's hair: Scalp Team 6 to the rescue (VIDEO). - Slate
Watch SNL's cut sketch about saving Donald Trump's hair: Scalp Team 6 to the rescue (VIDEO)..
Posted: Wed, 11 Nov 2015 08:00:00 GMT [source]
Draw the direction of the hair, creating the 3D form of the haircut. The strands we'll be partially visible on top of the head as well. To follow this tutorial, you'll need some kind of head base. You can use mine, or create your own in some other style. This also kept the focus on the hair itself, but you could still make this look even better with some facial details! This could be based on someone you know or maybe even the face of a celebrity.
Wherever the curls protrude the most, the highlight shows. You can use the diagram below if you’re feeling lost on where to put the darkest values. With each stroke of your pencil, you’ll improve and develop your own unique style. Be patient with yourself and embrace the learning process.
Practice regularly and don’t get discouraged by initial attempts that may fall short of your expectations. While observing real-life references is crucial, developing the ability to draw hair from imagination is equally important. Draw a line from the hairline to the back of the head to create the hair part (this can be center or to the side somewhere). Starting at the hairline, sketch a line to indicate the parting of the hair (whether it is in the center or to the side). Next, sketch several thick, long locks of hair extending from the top of the head to the shoulders (or wherever you prefer).
Once again, carefully follow the arrows in the reference images to get the flow looking good. This is something I learned Figure Drawing and it helps when drawing cartoons a lot. What you're going to be doing is an extension of what we learned in Lvl 0 Designing Simple Cartoon Characters with Flat Shapes.
Welcome to Artlex!
Start from the root and gradually work your way towards the tips, paying attention to the direction and flow of the strands. Lastly, it is time to go over your drawing with ink. So, using the pen of your choice, trace over the graphite marks. If you want line variation then use a couple of technical pens with different-sized nibs or a brush pen.
By carefully observing and manipulating negative space, you can create a sense of depth and realism in your hair drawings. Hair is not static—it moves and flows with the slightest breeze or motion. To capture this dynamic quality, incorporate movement and gestures into your hair drawings.
Draw some more thin tips on the bottom of the haircut. Add gentle waves above the first strand-lines without touching them. Draw the outline of the strokes surrounding the face. Hair is grouped in strands, and that's what we see.
The pencil strokes are more blended out because of the frizzier texture of the hair. This hair appears much lighter than the previous example. This study shows what frizzy or permed hair looks like. The curls are less distinct here because of the randomness of the hair direction and the overlapping of hair strands. For the top part, we are going to use loose “C” shapes, as shown in the diagram, following the direction of the arrows. For more fluid and dynamic hair, use three kinds of strokes.